Keep a children's book character consistent on every page
Children's book character consistency: build a model sheet before page one, check each spread against anchor features, and use an AI turnaround as reference.
A turnaround sheet for 3D modeling needs front, side and back on one baseline. Which of 8 views make reference planes, and how to test AI ones.
For 3D modeling, a turnaround sheet needs front, side and back views on one baseline, at the same scale and with as little perspective as possible. Three-quarter and top views help you judge volume, but they make poor reference planes. An AI-made sheet can work if you test it first: line the views up on horizontal guide lines and measure where the heights disagree before you model from it.
MultiAngle's character turnaround sheet generator makes 8 views from one A-pose drawing. This post is for modeling by hand in Blender, Maya or ZBrush. We did not open Blender or any 3D tool for it: what we tested is how well the views line up, not how a model built from them turns out. If you want an AI tool to build the mesh instead, read multi-view images for image-to-3D.
Key takeaways
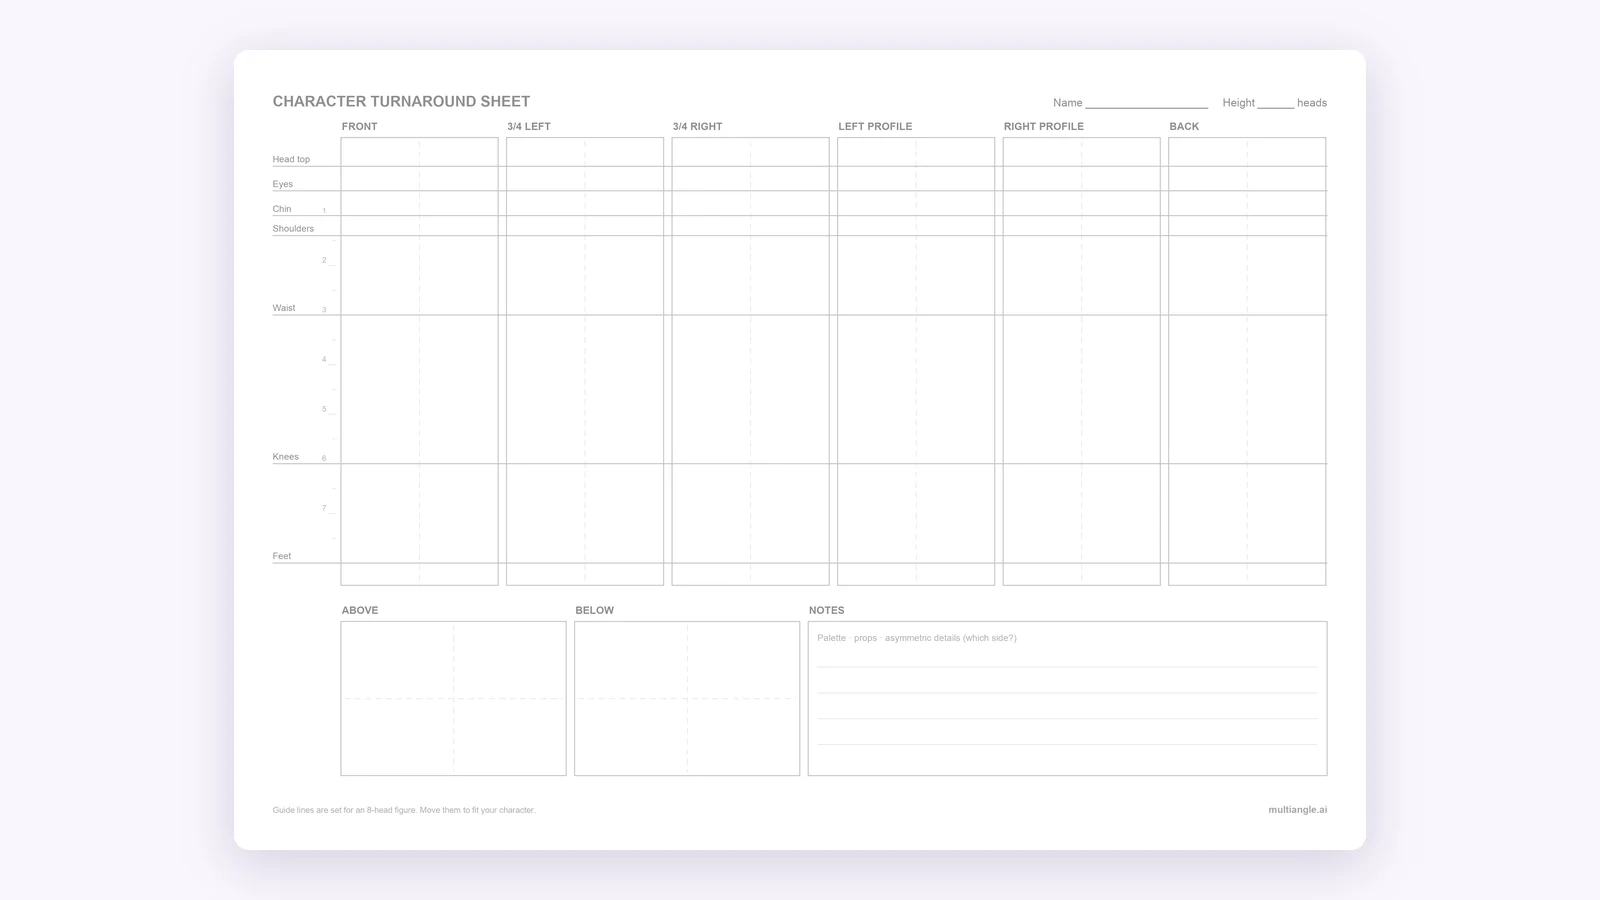
A modeler needs front, side and back views drawn on the same baseline at the same scale, in a neutral stance, with no perspective bending the proportions. Mimic Cartoon's guide says front and side are enough to block out a model, that the 3/4 and back views "remove important ambiguity", and that views should be "aligned and distortion-free as practical" (checked 2026-09-26). It marks guide lines at the head top, eyes, chin, shoulders, hips, knees and ground. A model sheet adds construction notes, colours and expressions to that turnaround; the difference between a reference sheet, a turnaround and a model sheet is covered separately.
The doubt about AI references is stated bluntly on Reddit. A top reply in an r/IndieDev thread about AI reference perspectives says generating references with AI is probably a bad idea, because you get a lot of weird perspectives and geometry. An r/blender thread says anything that shows the character in perspective is mostly useless for accurate modeling reference (both checked 2026-09-26; we did not keep links to the threads). That is the claim this post tests rather than repeats.
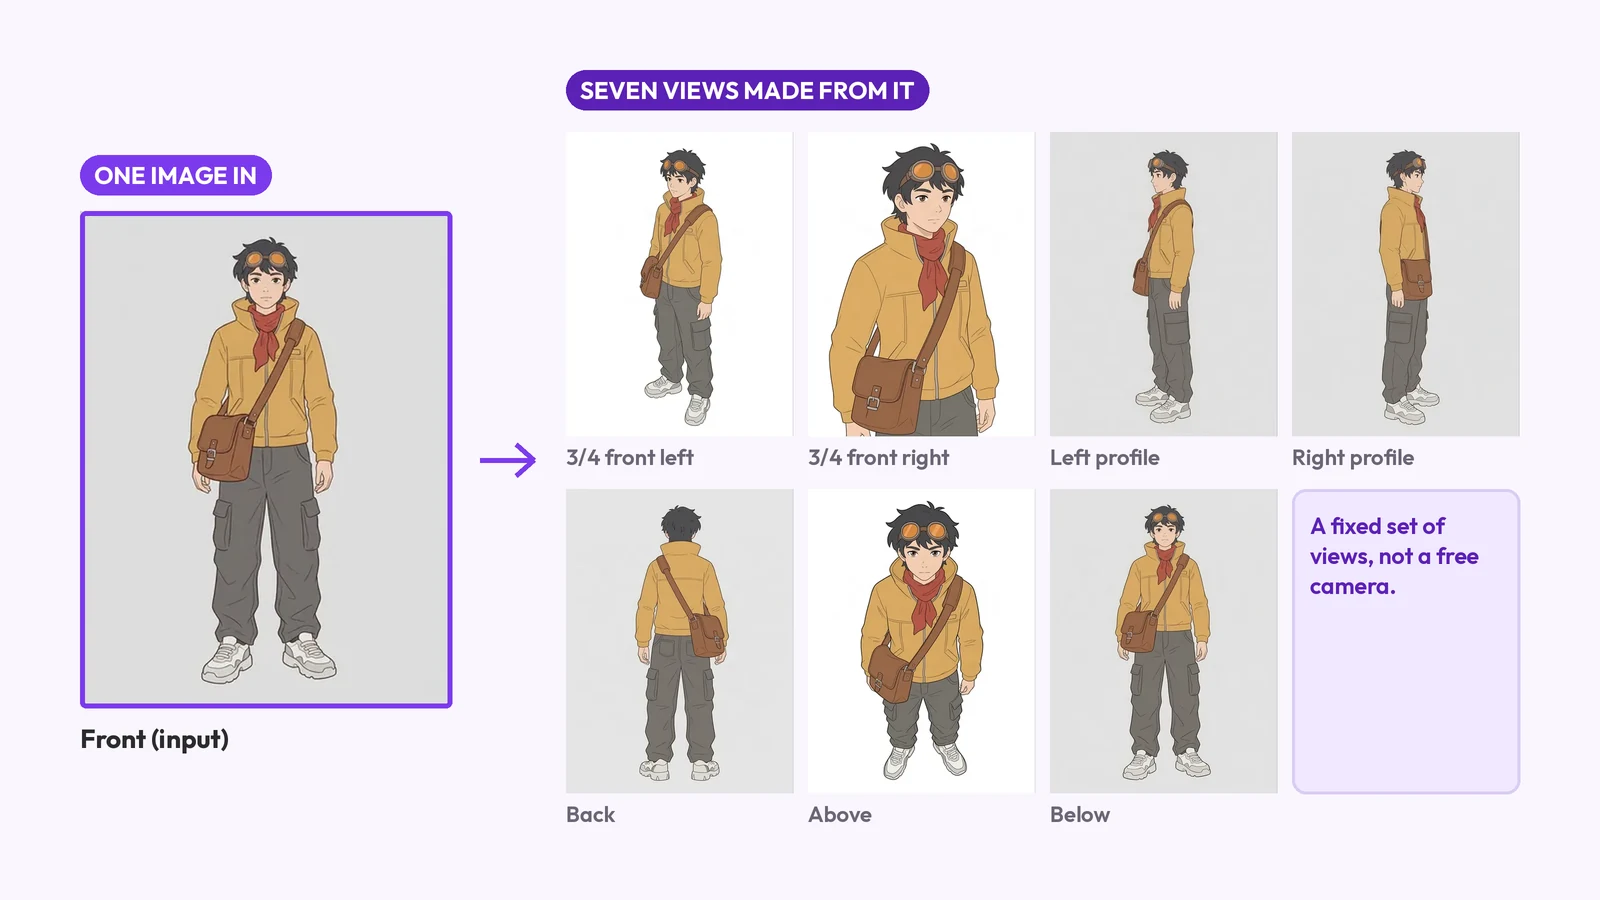
Front, left profile, right profile and back become reference planes. The two 3/4 views, above and below are for checking volume by eye. The table maps each of MultiAngle's 8 views, front, 3/4 front left, 3/4 front right, left profile, right profile, back, above and below, to a role.
| View | Use | Common problem |
|---|---|---|
| Front | Reference plane; sets the heights for every other view | None, if your drawing is clean |
| 3/4 front left | Volume check only | Not square to the camera, so features don't line up with a plane; the far foot floated 11 points above the near one |
| 3/4 front right | Volume check only | A much closer framing, cut off at the bottom of the frame |
| Left profile | Reference plane | The far foot sat about 7 points higher than the near one; check which side the prop is on |
| Right profile | Reference plane | The far foot sat about 8 points higher; check which side the prop is on |
| Back | Reference plane | Invented: your drawing never showed it; the goggle strap seen in the profiles did not show as a band |
| Above | Volume check only | A clear high angle, but not straight down |
| Below | Volume check only | Looked like a second front view: we saw no low angle |
In our run the profiles carried perspective, the 3/4 views were not square to the camera, and the above and below views were not straight down or up, which is why they sit in the "volume check" rows. The problems in the last column are what we saw on one test character; the sections below show how.
We did not open Blender, Maya or ZBrush for this post, so we are not giving menu paths, key names or panel settings, because we have not checked them against any version. Use your package's own documentation for loading reference images; for Blender, that is the Empties page of its manual. What we can say from the alignment test below is what to prepare before you load anything:
For a different way of building the sheet, CG Cookie has a tutorial on drawing a character sheet for modeling in Blender with Grease Pencil, to scale (checked 2026-09-26). If you draw the views yourself, a free turnaround sheet template with guide lines gives you the baseline.
The test asks whether the front, side and back views from one input line up well enough to model from. We used the test character from the image-to-3D post: an original courier made with Nano Banana, run through the character turnaround template, with the front view being our own upload. We did not open Blender and we did not build a mesh, so we cannot say whether the outlines would agree around a blockout. What we can say is where the views disagree with each other.
The method is simple. We scaled each view so the head top and the lowest sole sit the same distance apart, drew the seven lines of the first turnaround post across all four views (with the waist read at the jacket hem and the knees at the trouser creases), and read where each feature lands against the lines set from the front view. The positions are read by eye on enlarged crops with a ruler, as a percentage of body height, so each carries an error of about one point.
| Feature | Front | Left profile | Right profile | Back |
|---|---|---|---|---|
| Eyes | 10 | 10 | 10 | not visible |
| Chin | 14 | 16 | 16 | not visible |
| Shoulders | 20 | 19 | 20 | 20 |
| Jacket hem | 45 | 44 | 44 | 46 |
| Knee creases | 72 | 74 | 72 | 72 |
| Far foot's sole | 98 | 93 | 92 | 99 |
Head top is 0 and the near sole 100 in every view, because that is how we scaled them. Before scaling, the character filled about 90% of the frame height in the front, profile and back views, so the rescale was small.
Along the body the views agree closely: the eyes, shoulders, jacket hem and knee creases all land within two points of the front-view lines. The chin reads two points lower in the profiles than in the front; we are not sure how much of that is drift and how much is how a chin reads side-on. The big miss is the feet. In both profiles the far foot's sole sits 7 to 8 points above the near one, and in the 3/4 front left view 11 points above. In the front and back views the two soles are within about two points of each other.
That gap is the kind of thing a camera slightly above the floor produces: the far foot is farther away, so it sits higher in the picture. A true side-on orthographic view of a standing figure would put both soles on one line, so these views are not orthographic. We cannot rule out that the model moved the foot rather than the camera, but the pose is a standing one. Our reading of the numbers: along the body the front, profiles and back agree closely once scaled to one height, so they look usable for a blockout if you match the near foot, but they are not blueprint-accurate. We did not model from them, so that is a judgement from the measurements, not a result. Treat the far foot, and anything depth-dependent, as perspective. This is one character in one run, read by eye, so check your own set the same way.
Fix the sheet before the model. Scale every view to the same height, align the ground line, flip-check the profiles, treat the 3/4 views as volume reference only, and redraw anything that is invented. Doing this in an image editor costs minutes; finding a mismatch after you've modeled costs hours.
Generated views are good enough for blocking out a shape and not good enough to trust blindly. They fail in the places that matter most for modeling, so the alignment check comes first.
Upload one A-pose drawing to the character template. You get 8 views: your upload and 7 generated ones, for 7 credits. Measured in production in September 2026, that is 24–49 seconds of analysis, then 12–25 seconds per angle on average. Download PNG, JPEG and WebP, plus a ZIP of the set, at 1K on Free and Creator and 2K on Pro and Studio.
The plan prices and credits show what each tier covers, and how MultiAngle generates a set explains the steps. For checking each view against the drawing, see how to keep an AI character consistent across angles.
Make reference views for your model
For reference planes in an orthographic viewport, yes in the sense that perspective in the image makes features miss their lines. Mimic Cartoon's advice is "aligned and distortion-free as practical" (checked 2026-09-26). Test your views with guide lines. Do not assume an AI sheet is orthographic.
For a blockout, yes, according to Mimic Cartoon (checked 2026-09-26). The back and the 3/4 views remove ambiguity, so add the back if the character has details behind.
Scenario's multi-view guide recommends an A-pose or T-pose for characters (checked 2026-09-26). MultiAngle keeps the pose of your drawing, so draw the pose you want.
No. In our run they were not square to the camera, so use them to judge volume by eye. The front, profile and back views are the planes.
Image-to-3D tools can build a mesh from three or four views. MultiAngle makes the views as images and does not build the mesh; multi-view images for image-to-3D covers which views each tool takes.
More on this topic: Character turnaround sheets and Character Turnaround Sheet Guides.
Children's book character consistency: build a model sheet before page one, check each spread against anchor features, and use an AI turnaround as reference.
An avatar template is a profile-picture design, a game body, an AI restyle or 8 views of one character. What each is, and how to make the last.
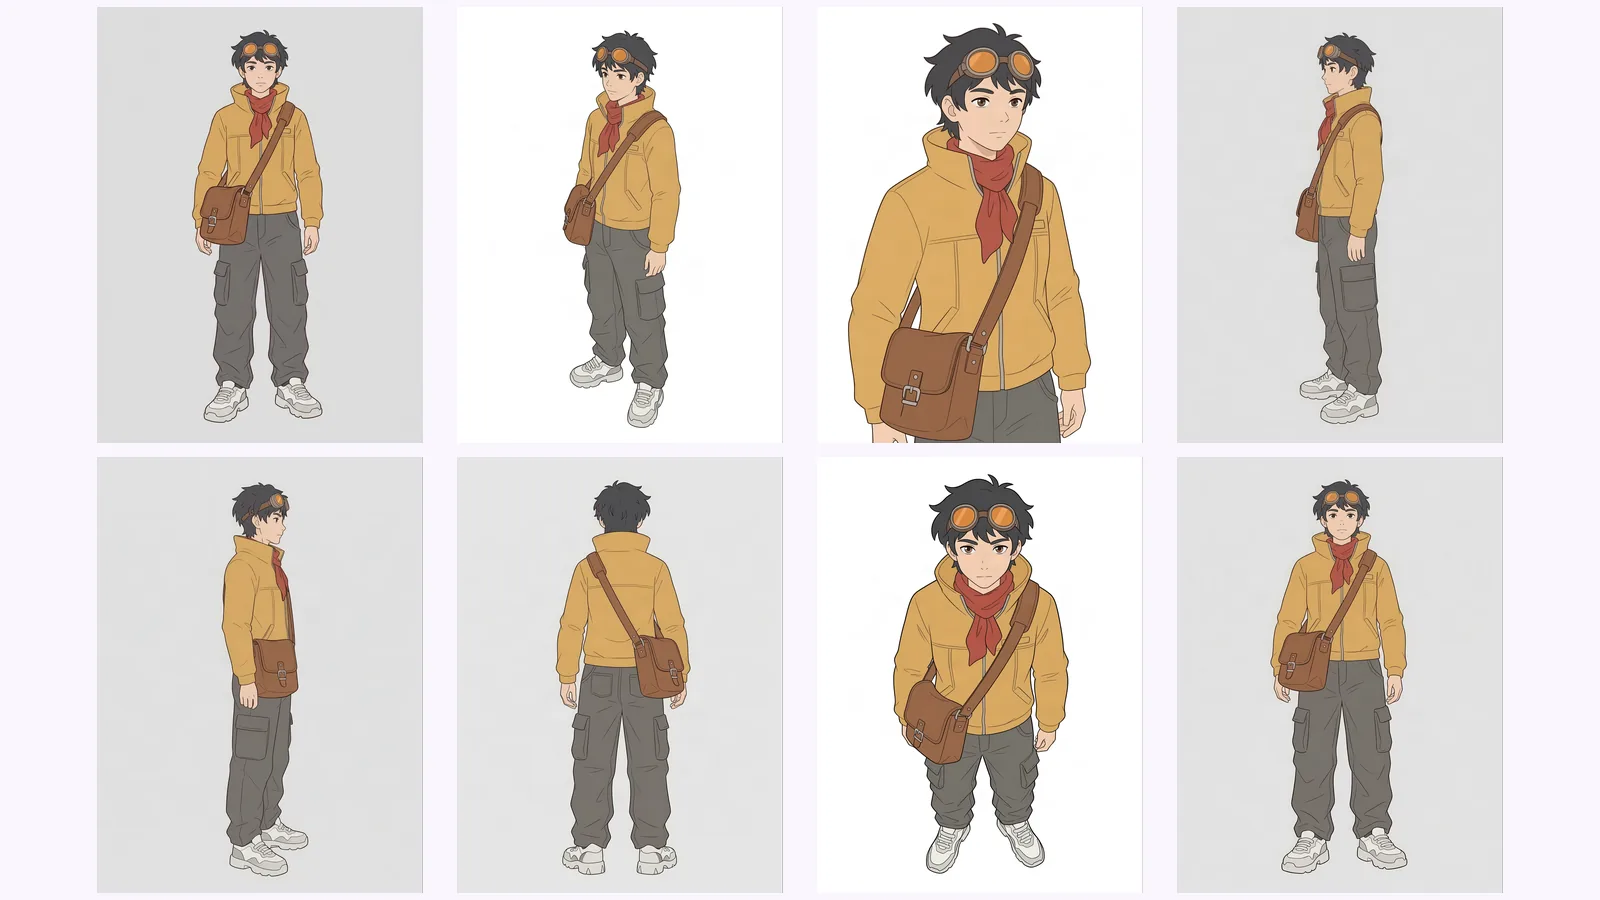
Keep an AI character consistent across angles: lock one reference, generate every view as one set, then check each view against a short list of anchor traits.